
Teacher
ULearning manual
Teacher manual
Goal: to offer learning materials in multiple languages in one and the same course environment.
In ULearning it is possible to build a course in multiple languages.
So you can place both Dutch and English text in the course environment. Depending on the user’s language setting, they will see the Dutch or English text. It is important that the course itself does not impose any language.
Operation
To indicate which sentences contain Dutch text and which sentences contain English text, you must indicate this using codes before and after the sentences. Place the texts you want to use between the correct curly braces to indicate whether they should be shown in the Dutch or, for example, English language setting.
Dutch text: {mlang nl} text text text {mlang}
English text: {mlang en} text text text {mlang}
Text that does not need to be translated and can always be shown does not need to be placed between the ‘code mlang’ / curly brackets.
Example:
Within a course this looks like this:
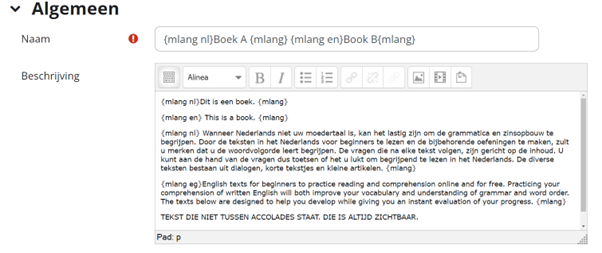
Example of entered text with code for language difference.
Dutch:
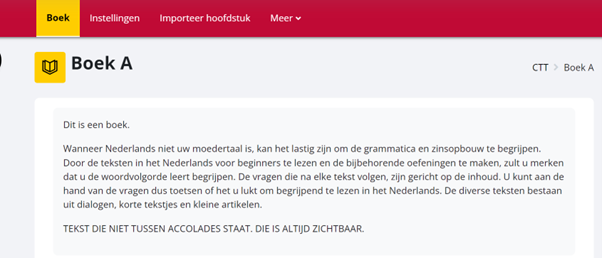
Example text in Dutch
English:
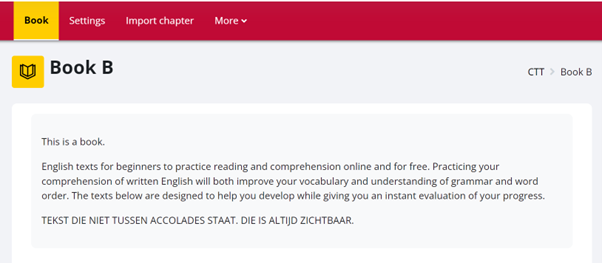
Sample text in English
It works everywhere you use the text editor.
It doesn’t work everywhere where text is shown. It does work in activity titles shown in the course overview, even though no text editor is available here.
Conditions
Course:
To use the multilingual course as a participant, it is important that you, as a teacher, set the language setting of the course to ‘Do not force’. You can find this setting here in the course.
Course settings –> Appearance –> Force language –> Do not force.
Participant:
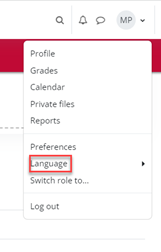
In addition, the participant must decide for himself in which language he/she wants to view the course. The participant then sets the desired language via his own personal menu.
News in toolbar changes to a forum activity in the course called Announcements.
There may be several announcements after the release. These become visible because the course has been copied multiple times in the past. In the old theme these forums were hidden, that is the reasons they come available now.
The top Announcements is the original News. The other announcements can be removed without any problems.

Full name of the course
This is the name of the course. This appears as a link on course lists on the homepage, dashboard, and in reports. When a course is taught multiple times on the ULeanring platform, make sure that the name of each course is distinctive from the other courses.
Short name of the course
If the course is available in Osiris, please enter the Osiris code here. If the course does not appear in Osiris, choose a logical code/abbreviation. So that a distinction can be made between courses with the same content that are taught multiple times (per year or every year) on ULearning.
Course category
This shows which course the category falls into. Does the course belong to Science? Then the Science category is shown here.
Course visibility
This setting determines whether a course appears in the list of courses and whether a student can access it. If you set this to “Hide”, access will be limited to users who have the ability to see hidden courses (such as teachers). Students/Participants will no longer see the course once it is ‘hide’.
Start date of the course
This setting determines the start of the first week for a weekly format course. It also determines the earliest date for which logs for this course will be available. If the course is reset and the course start date changes, all dates in the course will be moved relative to the new start date. The start date does not determine when a participant sees the course. As soon as the course is not set on ‘Hide’, the course is visible, even if the start date has not yet occurred.
End date of the course
After reaching the end date of the course, it will still be shown to participants in the ‘Dashboard’ and also in ‘My courses’. Unless the student uses certain filters, such as ‘Future’, ‘In progress’, ‘Past’. Courses can be filtered based on this and the start and end dates are used for this.
The course end date is also used to calculate the retention period before data is deleted. It can also be used by a custom report, for example to report activities over the course duration. The course will be offered for deletion 2 years after the end date.
Users can still enter the course after the end date; the date does not restrict access.
Preparation:
Preparing a video in the Video Platform before it can be posted on the ULearning and Inovate Platform:
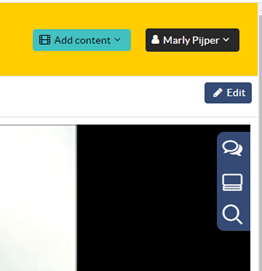
To the right of the video, click Edit:
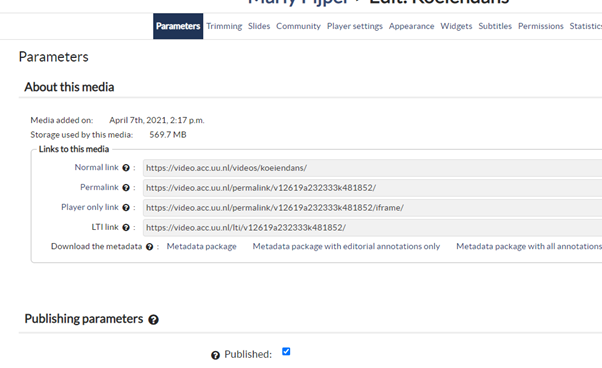
Click parameters and set to Published:
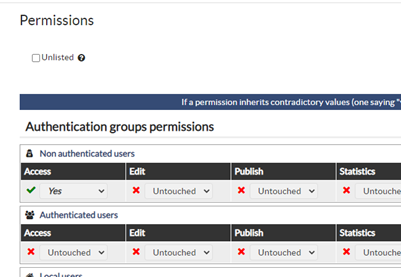
In order to show users without a Solis ID the video, it is also necessary to adjust the Permissions. Go to Permissions and change Non-authenticated users to ‘Acces’ to ‘Yes”.
Users with a solis-id can also view the video embedded on the Moodle platform.
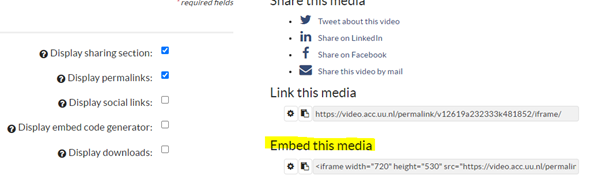
Please note! If you want to prevent the video from being shared, it is important to turn off the Share options.
Go to Communities:
Turn off the Display Sharing section.
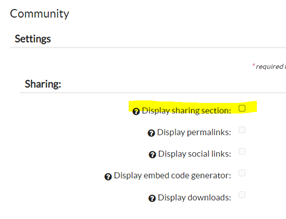
Users cannot easily share the video in this way.
Embedden on the Moodle Platform:
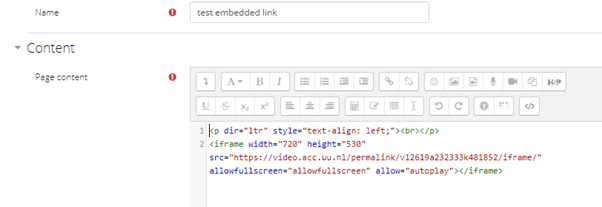
Go to the appropriate course environment and add the Page activity.
Open the arrow next to Page content and choose the html option:
![]()
The HTML option appears, here you can place the link of the video platform.
Go to the video platform à Communities and copy the link under Embed this media:
Paste this link under the HTML code of the page contect.
Save the page.
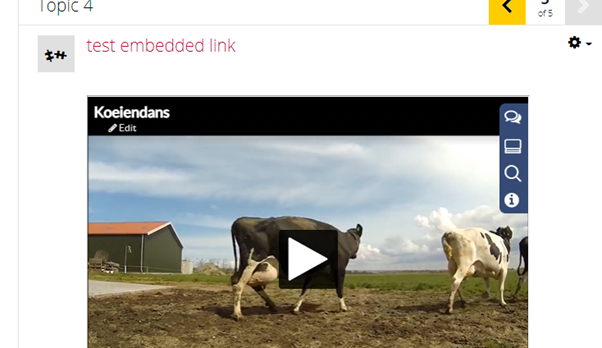
The video is now embedded on the platform:
In the old theme, you can add the ‘Discuss’ component via the settings of the activity. This activity will be listed under the activity.
This part has been discontinued. Instead, you add a new block to the activity, namely the block ‘Social comments’.
1. Go to the activity within the course where you want students to say something about this activity.
2. Enable Edit mode in the course.

Figure 10. Edit mode in an activity.
3. The ‘block drawer’ appears on the right side of the screen. Open the block drawer by clicking on the arrow.

figure 10. OPen the block drawerp
4. Click on ‘Add a block’.

Figure 11. Add a block.
5. Choose the block called ‘Social comments’.

Figure 12. Add Social comments block.
6. The Social comments block has now been added to the course. Turn off Edit Mode.

Figure 13. Social comments block added at activity.
7. When a student enters the course for the first time, the ‘block drawer’ is shown knocked out, so that the block is visible for the relevant activity.
After the release there is no completion progress visible per learning unit. As an alternative there is an completion progress bar available that covers the progress over the whole course.
As teacher you have to add this progress bar to youre course. Here you find the instructions how to do this.
1. Go to the relevant course.
2. Enable Edit mode in the course.

Figure 6. Enable the Edit mode in the course.
3. You can add a Block at the top of the course.

Figure 7. Add a block on top of the Course Overview.
4. Click on ‘Add a block’.
6. 5. Choose the block called ‘Completion progress’.

Figure 8. Add Completion Progress block.
7. The block has been added. The Progressbar is now visible on the top of the page.

Figure 9. Completion Progress bar added to the course.
8. If you click on the gear in the top right corner, the progress bar can be slightly adjusted.
9. If you click on the Overview of Students you can see the progresso of every student in the course.
Proof of Participation
Introduction
Within ULearning, you can use the Proof of Participation activity to have students receive a certificate once they meet certain requirements within your course. This activity is especially useful to give participants recognition for their participation or completion of components within the course other than their completion status.
Operation within course
You add this ‘proof of participation’ to your course via an activity. As teachers, there are three settings that specifically belong to this activity, namely Template, Expiry date and Automatic Sending. These are described further below.
Template
As a teacher, you can choose from existing templates for the ‘certificate of participation’.
These templates are created site-wide by the Admin. The templates can be set per course category. This means that a template does not have to be available in every course category. If you do not know which template to choose or if exceptions need to be made to your course, please contact your key user via ulearning-support@uu.nl
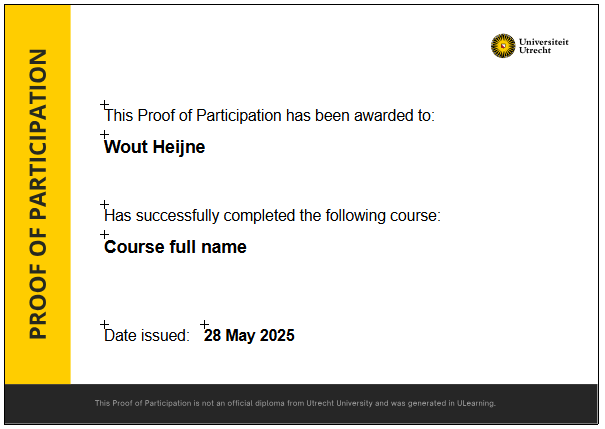
the Standard Template Standard Proof of participation (EN) looks like this:
Expiry date
As a teacher, you can give the ‘certificate of participation’ an expiry date. You can choose ‘Never’, ‘Select date’ or ‘After’.
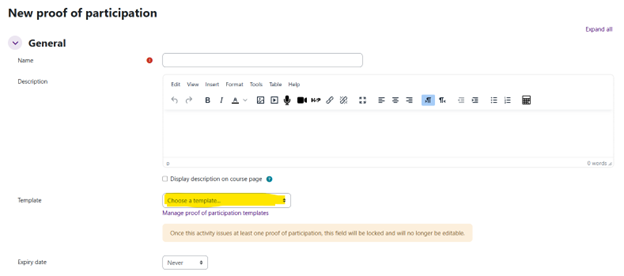
Fig. 2. Certificate of participation – specific settings (template and expiry date)
Automatic sending
When the activity is created, you as a teacher will get the option that if the student meets all the requirements, the certificate will be sent directly to the student’s email.
If this option is not enabled, the student will have to click on a link to receive the pdf, once all restrictions have been met.
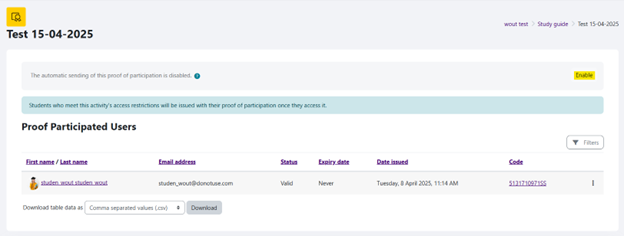
Fig. 3. Proof of participation – Enable automatic sending
View issued Certificate of Participation as a teacher
If the Certificate of Participation has been distributed to the participants, you can view it as a teacher in the activity itself.
The following data is shown:
| First name/ Last name | |
| Email adress | |
| Status (invalid/valid) | |
| Expiry date | |
| Date Issued | |
| Code | By clicking on the code you can verify the certificate |
In addition, you can view, regenerate or revoke (invoke) per certificate/student.

Fig. 4 Revoke an certificate
Correct date with course completion
To get the correct release date for users that is on the template, the course completion must first be enabled on the course.
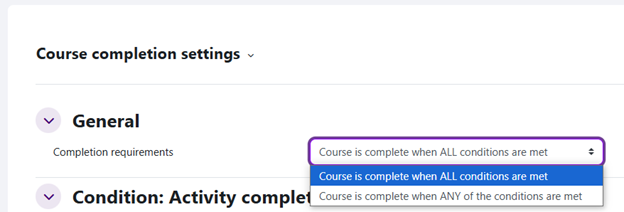
How do you enable course completion?
- Under more go to course completion.
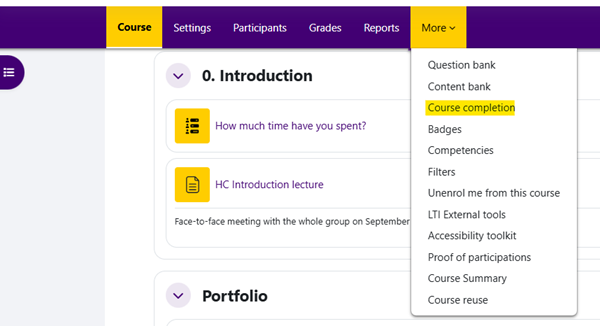
- In general, you can choose to have one or all activities count towards the completion of a course. Based on these and the next step, the completion of the course will be determined.
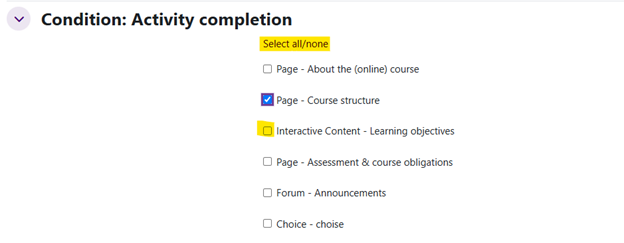
- In condition: you can indicate which activities need to be done to be able to complete the completion. For example page – intro and quiz – test your knowledge are checked then these need to be done.
- If you want to select all then use the button at the top of the list of activities and click on the button at the top select all/none
- Activity Completion Condition
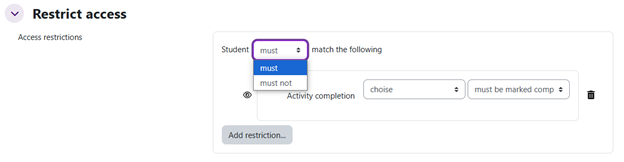
Activity Completion ConditionHow do I enable Activity Completion Condition?Go to your course settings.Then, check that the Activity Completion settings are configured for each activity.For example, add a Certificate of Participation activity (such as an assignment, quiz, or certificate).Click on Restrict Access and then on Add Condition → choose Activity Completion.Explanation of the buttons and optionsChoose must if the student must have completed the selected activity to gain access. - Choose may not if the student does not have to have completed the selected activity yet.
- 1. The student must/may not meet the following conditions
- You will now see a box with a number of settings. Below is an explanation of what the different buttons and options mean.
- 3. Scroll down to “Restrict Access”
- 2. Add or edit the activity
- Set Track Completion to Yes.
- 1. First, make sure that activity completion is enabled:
- Activity Completion in ULearning lets you guide students through your course step-by-step and automatically track their progress. By enabling activity completion, you set conditions that students must meet before they can access certain components, such as a quiz, assignment, or Certificate of Participation.
- The eye icon
- If the eye is open, students can see the activity, including the reason why it is not yet available.

- If the eye is closed, students can only see the activity once they meet the conditions.
As a user, you can toggle between the two options by clicking the icon.
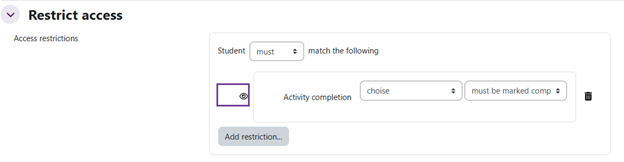
- Activity completion: choose an activity
- Click on Choose … to select which activity serves as the condition.
- After selecting an activity, you will see additional options:


Completion condition:
- Must be completed – the student has finished the activity (manually or automatically).
- Must not be completed – the student has not yet finished the activity.
- Must be completed with a pass – the student has completed the activity with a passing grade.
- Must be completed with a fail – the student has completed the activity with a failing grade.

- bin-icon
- This allows you to remove a condition you no longer need.

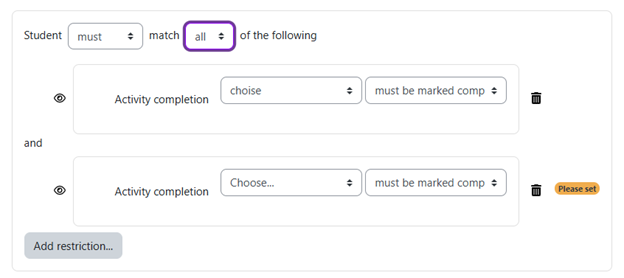
- Add condition
- This lets you add extra conditions, for example if a student needs to complete multiple activities.
- You can combine multiple conditions with “All of the following” (AND logic) or “Any of the following” (OR logic).
The schedule as it was in the old theme in the taskbar is no longer available. This can be added as a block to the course.
Here are the instructions for adding the Block schedule to the course:
1. Go to the relevant course.
2. Enable Edit mode in the course.

Figure 1. Turn Edit Mode on and open the Block drawer with the arrow on the right.
3. The ‘block drawer’ appears on the right side of the screen.
4. Click on ‘Add a block’.

Figure 2. Add Block
5. Choose the block called ‘Calendar’.

Figure 3. Add the Calender block.
6. The Calender block has been added to the course. Turn off Edit Mode.

Figure 4. Calender is visible in the course for the students.
7. When a student enters the course for the first time, the ‘block drawer’ is shown unfolded so that the calender and other added blocks are visible for the students.
Help
My question is not answered in this manual, what should I do?
Please contact your e-moderator or e-mail ulearning-support@uu.nl.
I would like to add a question and answer to this Manual, what should I do?
Send an email to ulearning-support@uu.nl.